Rear-facing Only car seats (RFO’s) are optimized for newborns and infants.
They’ve got 2 parts:
1. A base that remains installed in your vehicle
2. A bucket-like infant carrier that snaps in and out of the base. This carrier can also be used in a car by itself (without the base) and with a stroller frame.
RFO seats (specifically the carriers) are extremely portable:
carriers are lightweight
carrier can be used without the base in rental cars, uber, taxis, etc
carrier fits on a variety of strollers, enabling a smooth move from vehicle to stroller to house without requiring waking the baby.
can purchase additional bases to install in a second or third vehicle
All RFO car seats have a maximum height AND weight limit. Each seat is different, but typically:
maximum weight is 30 to 35 lbs,
maximum total height is 28 to 35 inches
maximum torso height is when there is less than one inch from the top of the child’s head to the top of the carrier.
When your child has reached ONE of these limits they are too big for the RFO seat and must move into a larger car seat.
The vast majority of children will be too tall for their RFO car seat before reaching the seat’s maximum weight limit.
ALWAYS check your car seat’s instruction manual, look at the labels on the seat, or call the car seat’s manufacturer to find out your car seat’s weight and height maximums.
See our rear-facing convertible (toddler) seat recommendations to help you choose the next seat.
Your child doesn’t need to stay in the RFO car seat until they reach the seat’s maximum height/weight. They may move into a rear-facing convertible car seat at any time, as long as they meet that new seat’s minimum age, height, weight and developmental requirements. See our convertible recommendations here.
Reasons to switch to a convertible before your child has met the RFO’s maximum height or weight limit include:
the RFO seat feeling too heavy to tote on and off the stroller
a reduced need for portability
the child wanting to sit more upright in the car
the need to make room for additional car seats or passengers in the vehicle.
Pro Tip: Keep your infant carrier if your baby still fits in it! You can still use it on vacations, in rental cars, on planes, and if you need portability for another specific situation. It’s always much easier to travel with an infant carrier + stroller than with a convertible car seat.
This video shows how to properly buckle your baby in the car seat straps. Properly snug straps will work to keep your baby safe in a crash, but also help babies breathe better in the car seat by preventing the baby from slumping over and by keeping the head better positioned. Watch this video to make sure you’re buckling your baby properly.
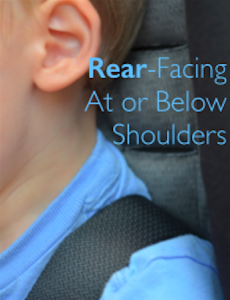
Proper Strap Position: The shoulder straps must be emerging from the back of the seat at or just below your child’s shoulders, as seen in this photo.
If you can see the slot where the straps are emerging from the car seat, the straps are too high and must be lowered.
Why do the straps need to be set this way? Properly set straps prevent a child from sliding up the seat in a crash, so they are very important. They also keep a child in the proper position in the car seat when outside the car, so that the child doesn’t slouch or slip into an unsafe position.
Note: A newborn baby may require an infant insert to reach the lowest slot. The insert would be included in the box with the car seat. (Do not use any inserts that were not sold with your car seat.) The infant insert sits underneath the baby’s bottom and raises them up so that their shoulders reach the lowest slot.
What is an infant insert? This is a removable pad that sits underneath and possibly behind a newborn or small infant. In this photo the green padding is an infant insert, and this 11lb baby has just outgrown the need for it.
Why do you need an infant insert? To safely use a rear-facing car seat, a child’s shoulders must come up at least to the lowest harness slot on the seat. As most newborns aren’t tall enough to reach this slot, RFO car seats often come with a removable infant insert designed to rest under the baby’s bottom, making the baby sit higher in the seat, so that their shoulders reach at or above the lowest strap slot. Some infant inserts are mandatory at certain weights or heights and some are not, so check your car seat’s instruction manual to find out your seat’s requirements.
When can you stop using the infant insert? You may stop using the insert when your child’s shoulders are even with the lowest harness slot setting, or when your seat recommends discontinuing use of the insert. ALWAYS check your car seat’s instruction manual to make sure you are using the insert the right way.
Padded head inserts: Infant inserts that just go behind the baby’s head may cause the head to fall into a potentially unsafe position. We recommend these inserts not be used unless specifically required by the manufacturer.
Note: It is NEVER okay to add another infant insert to the car seat. If it did not come with your car seat, don’t use it!
Strap covers: These typically get in the way of a tight fit, so if they are not mandatory (and most are not), we recommend removing them from the car seat.
The closer the crotch buckle sits to the baby’s bottom, the less the baby can slouch. When baby slouches, her head can fall forward onto her chest, possibly causing breathing problems. If there’s a significant space between your baby’s bottom and the crotch buckle, take a tightly rolled up washcloth and AFTER tightening baby in the straps, place the washcloth along the baby’s inner thighs in a U-shape to fill the gap.
Nearly 10,000 infants a year in the US suffer a head injury when they fall from or in their car seat when its used out of the car. That’s about equal to the number of babies injured in car crashes! Another study found that between 2004-2008, 31 babies died in their car seats due to asphyxiation (lack of oxygen) or strangulation. Most of these injuries occurred outside of the car and often to older babies–the median age was 9 months.
Jaxon 8/1/2014-10/8/2015
Jaxon’s mom Meredith wants you to know that Jaxon was a bubbly and precocious child, walking at 10 months and running just weeks after. On October 8th 2015, Jaxon ran some errands with his caregiver and fell asleep in his infant car seat. Not wanting to wake him, the caregiver brought him inside to a quiet room so he could finish his nap. The caregiver left the chest clip buckled, but unbuckled Jaxon’s crotch buckle – a mistake many adults make because they feel bad about leaving a baby buckled, especially while sleeping. Jaxon wiggled in his sleep and as he slipped down his throat got caught on the chest clip – and the more he wiggled, the worse it got. When the caregiver went to check on him, it was too late. He had strangled to death. Had the crotch buckle been buckled, he wouldn’t have been able to slouch down, which is what enabled him to strangle on the chest clip.
Shepard 1/14/2015-4/6/2015
Shepard was the healthy baby his mom Ali had longed for after 4 miscarriages. On April 6, 2015, Shepard was in the home of his licensed daycare provider. When it was time for his nap, Shepard was swaddled and placed in his car seat. The straps were left completely unbuckled, presumably because he was “just in the house.” While he was sleeping, Shepard wiggled and slouched and his head fell down into a chin-to-chest position. Because he was so young he couldn’t lift his head up to open up his airway. No one noticed in time, and he asphyxiated to death at just 11 weeks of age. Had he been buckled snug he wouldn’t have been able to slouch down, which is what caused his chin to fall to his chest.
Which kids are at risk?
Strangulation:
Any child of any age in a car seat where the straps are completely unbuckled (kids can get caught in the straps)
Any child of any age in a car seat where the chest clip is buckled but the crotch buckle is unbuckled
Asphyxiation:
Any child who is unable to sit upright unsupported – typically babies under 6 months of age
How to avoid this happening to your family
1. Use the car seat as a car seat. Car seats are NOT strollers, cribs, baby swings, a place to nap at daycare, etc. Use the car seat in the car, and then remove the baby from the seat when you arrive. We know it’s a shame to wake a sleeping baby! If you aren’t going to wake your sleeping baby when you get home, make sure to follow the rules below to minimize risk.
2. Put the car seat in the car, on the stroller, or on the floor. Never put the car seat on a soft surface – like a bed, sofa, or even in the baby’s crib. Car seats can overturn when babies wiggle in them and babies have suffocated when their faces press into the soft surface.
Never put the car seat on a shopping cart, counter top, restaurant high chair, table, sofa, etc. Even though it might seem like a good idea in the moment, car seats get knocked off of these high surfaces all the time, leading to the nearly 10,000 head injuries in babies every year in the US.
3. ALWAYS keep the straps completely buckled AND snug. Do not loosen the straps…even if the baby is just finishing his nap on your living room floor, or you’re just in the stroller, or just anything. Snug straps help babies breathe better by preventing the baby from slumping over and by helping keep the head better positioned. Snug straps make it less likely for the baby’s head to fall into a chin-to-chest position. Loose or unbuckled straps are an asphyxiation risk because the baby’s head can fall into an unsafe position for breathing, as happened to Shepard. Loose or unbuckled straps are also a strangulation risk as the baby can roll over and get his neck caught in the straps.
Do not buckle just the chest clip – this is a significant risk for strangulation. The crotch buckle is there to prevent your child from slouching down in the seat. Without the crotch buckle, babies have strangled on the chest clip; babies like 9-month-old John Norris, 14-month-old Jaxon Lemerand, 17-month-old Major Maxie, and too many others.
Family members reached out to us after these close calls:
This 8-week-old’s mom said “I left him to make his bottle and came back to this!”
The mom of this 1 week old said “I *just* set her in the seat while I grabbed my toddler’s shoes from the other room. I was gone for less than a minute.”
1. Read your car seat’s instruction manual! (Hint: This is always the first step when doing anything with the car seat!) If you can’t find the physical manual check the car seat’s website as most manufacturers post a pdf of the manual online.
2. Prepare your workspace. Park the car in a well lit area, on level ground, and in a space where you will be comfortable working. Move the front seats up all the way to give yourself enough space to work. Remove belongings from the backseat and clear the floor area. It’s best to stand in the car directly in front of the car seat, between the back seat and the front seat, facing the back of the car.
3. Locate the lower anchors in the vehicle. Note that for most vehicles, you must install the car seat base on the side seat if you want to use the lower anchors–as most vehicles do not permit a lower anchor installation in the center seat. Your vehicle owners manual will clarify where you can install your car seat. Read it before assuming you can install the car seat in any seating position. See our Where are my Lower Anchors page for more info on finding the lower anchors.
4. Locate the lower anchor connectors on your car seat base (they will not be on the carrier). They may be hooked onto the side of the base, or snapped into storage slots, or folded up in a panel on the base. Use the car seat’s instruction manual to help you locate the connectors. If you are using flexible connectors, lengthen the strap it as long as it will go. If you cannot figure out how to lengthen the strap, check your car seat’s instruction manual for directions.
5. Attach the lower anchor connectors on the car seat to the lower anchors on the vehicle seat. If your vehicle has visible lower anchors this shouldn’t be too difficult. If the lower anchors are hidden between the vehicle seat upholstery this can be hard. Don’t give up! Feel around in the seat with your fingers until you find the anchors and then attach the connectors. It is much easier to do this when you are standing in the car as described in step 2.
Make sure you have attached the lower anchor connectors in an upright position.
For a hook-on connector : opening goes towards the floor of the car. Here’s a video
For a push-on connector: connector is oriented like a stapler, not like an upside-down stapler.
6. Tighten the strap (you can skip this step if you have rigid LATCH) Stand in the car directly in front of the car seat, between the back seat and the front seat, facing the back of the car. If your base has a flexible LATCH system with a strap, push down on the car seat using your hand, foot, knee, etc, as you tighten the lower anchor connector strap. Pull the strap from the inside of the base, up towards your body, as you push down on the base. The seat should be installed so tightly that it moves less that one inch from side to side and front to back when you pull and push on it where the lower anchor strap is.
7. Make other necessary adjustments: verify the seat is properly reclined, adjust the load leg (if present), etc. These adjustments will all be described in your car seat instruction manual.
We’ve included a written set of general instructions and Installation Videos at the end for specific car seats.
Tip: It may be helpful to watch the videos even if you have a different car seat as many of the techniques we use are universal in their application.
1. Read your car seat’s instruction manual! (Hint: This is always the first step when doing anything with the car seat!) If you can’t find the physical manual check the car seat’s website — most manufacturers post a pdf of the manual online.
2.Prepare your workspace in the vehicle. Park the vehicle in a well lit area, on level ground, and in a space where you will be comfortable working. Leave the doors open if you have the space. Move the front seats up all the way to give yourself enough space to work. Remove belongings from the backseat and clear the floor area. It’s best to stand in the vehicle directly in front of the car seat, between the back seat and the front seat, facing the back of the vehicle.
5. Locate the seat belt pathway on your car seat base. This will be clearly pictured in the car seat’s instruction manual.
6. Route the seat belt through the seat belt pathway on the base and buckle the seat belt. It is much easier to do this when you are standing in the car as described in step 2.
7. Tighten the seat belt strap. Stand in the car directly in front of the car seat, between the back seat and the front seat, facing the back of the car. Push down on the car seat using your hand, foot, knee, etc, as you pull the shoulder part of the seat belt (the part on top) up towards you. Pull the strap from the inside of the base, up towards your body, as you push down on the base. Without letting go of the strap that you have pulled tight (keep it tight!), lock the seat belt in the preferred manner (this will be explained in the car seat’s instruction manual). The seat should be installed so tightly that it moves less that one inch from side to side and front to back when you pull and push on it where the seat belt is routed through.
8. Make other necessary adjustments: verify the seat is properly reclined, adjust the load leg (if present), etc. These adjustments will all be described in your car seat instruction manual.
All RFO’s sold today in the US, with the exception of one* can be used in a vehicle without the base!
Is this safe? YES! This is SAFE to do and one of the great conveniences of using a RFO car seat.
Why install without the base? Using the carrier by itself enables very easy travel in taxis, uber, rental cars, airplanes, grandma’s car, the nanny’s car, etc. It’s a very useful feature of infant seats, especially for families in urban environments where taxis and uber are a main mode of transportation.
Always read the instruction manual that came with your car seat
Always read your vehicle owner’s manual
Pull the seat belt or LATCH strap from the inside of the car seat as we show in this video (video is of a convertible car seat but the same method applies to RFO bases.)
What is a load leg? A load leg, also sometimes called a stability leg or a foot prop, is a metal bar that comes down from the edge of the RFO base and rests on the vehicle floor. Only a few US car seats feature a load leg, even though they are commonly found in Europe.
A load leg prevents the car seat from moving downward in a crash. Preventing this rotation means the baby also does not move downwards. Crash tests show that this significantly reduces the forces on a baby’s head and neck, thereby keeping the baby’s brain and spine safer.
To learn in much more depth how and why a load leg works, including crash test videos of the load leg in use, see this page all about load legs.
How to position the load leg: The load leg should rest on the vehicle floor. It should not push the base up off the vehicle seat cushion and it should not push the base up or be used to achieve the proper recline angle for a newborn.
For Cybex and GB car seats, the front of the base (the part closest to the front of the vehicle) must make contact with the vehicle seat cushion even when using a load leg. For Nuna, if you are using rigid latch to install the base, the front end of the base does NOT have to contact the vehicle seat cushion when using the load leg (so long as the base is properly reclined).
How to operate the load leg: Each RFO base is different and has its own installation method. Read your owner’s manual for specific instructions on using the load leg.
A few installation tips that apply to nearly all RFO bases with load legs:
Before you start to install the base, the load leg must be extended from the bottom of the base so that it’s available when you need it, usually at the end of the installation process.
Don’t extend (lengthen) the load leg towards the floor until you’ve secured the base in the vehicle.
If the load leg extends by itself (common with the Nuna Pipa, where it extends on its own as you are installing the base and often can cause the base to be too upright) simply ignore it and correct the leg’s length (and the seat’s recline angle) after securing the base to the vehicle.
Vehicle compatibility issues: There are some vehicle features that may prevent you from using the load leg. Since the load leg isn’t a required safety feature in the US (even though it is an added safety feature), if it doesn’t fit with your vehicle design you can still use the base in that position, just with the load leg tucked up under the base in its storage position. You could also try moving the base to another seating position in the vehicle to see if the load leg works there.
Vehicle issues that prevent the use of the load leg:
Humps: a center “hump” on the floor of the vehicle, where the floor is raised, can interfere with placement of the load leg and cause the base to be raised up at an angle that’s too upright for a newborn. Cybex, GB and Nuna all allow use of the load leg where a hump is present. HOWEVER: Cybex and GB require that the front of the base (the part toward the front of the vehicle) touches the vehicle seat, which may not be possible when a hump is present. Nuna does not have this requirement–the front of the base does not need to touch the vehicle seat provided the recline angle is set appropriately.
A very deep seat: Often on the side of some sedans or SUV’s, if the seat is very long/deep the load leg may not bend properly over the edge of the seat.
Stow N’ Go seating: load legs require a solid floor so are not permitted in Stow N’ Go locations where the floor is hollow.
All RFO car seats have a specified recline angle that must be achieved for the car seat to perform properly and also for the baby’s breathing.
The importance of the recline angle: Newborns and young babies don’t have head control. If they’re placed in an upright position, they can’t keep their heads up and will move into a chin-to-chest position. This position is dangerous because it can make breathing difficult. Older children and adults can (and will) simply move their heads out of this harmful position, but newborns and young babies can’t make this correction. Therefore, we must position their car seats at such an angle that this chin-to-chest position is unlikely to occur. At the same time, the car seat cannot be positioned too reclined, as this would negatively affect its performance in a crash.
How to see if your seat is reclined appropriately: Every seat will have a level indicator of some sort–a line on a sticker on the side of the seat, a line molded into the seat, a bubble level, a dial, etc. Here are a few examples: PHOTOS
How to adjust the recline: Each RFO base has some sort of adjustment mechanism you can use to make the seat more or less reclined. Usually there’s a “foot” that extends from the back of the car seat base (the part near the trunk of the car), making the base more reclined. See your car seat’s instruction manual to find out how to control your seat’s recline angle. Here are a few examples:
If your car seat is still too upright after extending the recline foot all the way: Sometimes it is necessary to put a tightly rolled towel or pool noodle under the base to make it more reclined, if the car seat’s own recline “foot” is not making the seat reclined enough. We recommend ALWAYS trying first with the car seat’s own recline adjuster before adding additional towels or noodles. Over the past years we have seen great improvements to car seat bases such that much fewer require a towel or noodle compared to bases made ten years ago. Of course always check with the car seat manufacturer to make sure they permit adding a towel or a noodle before using one–not all manufacturers permit this.
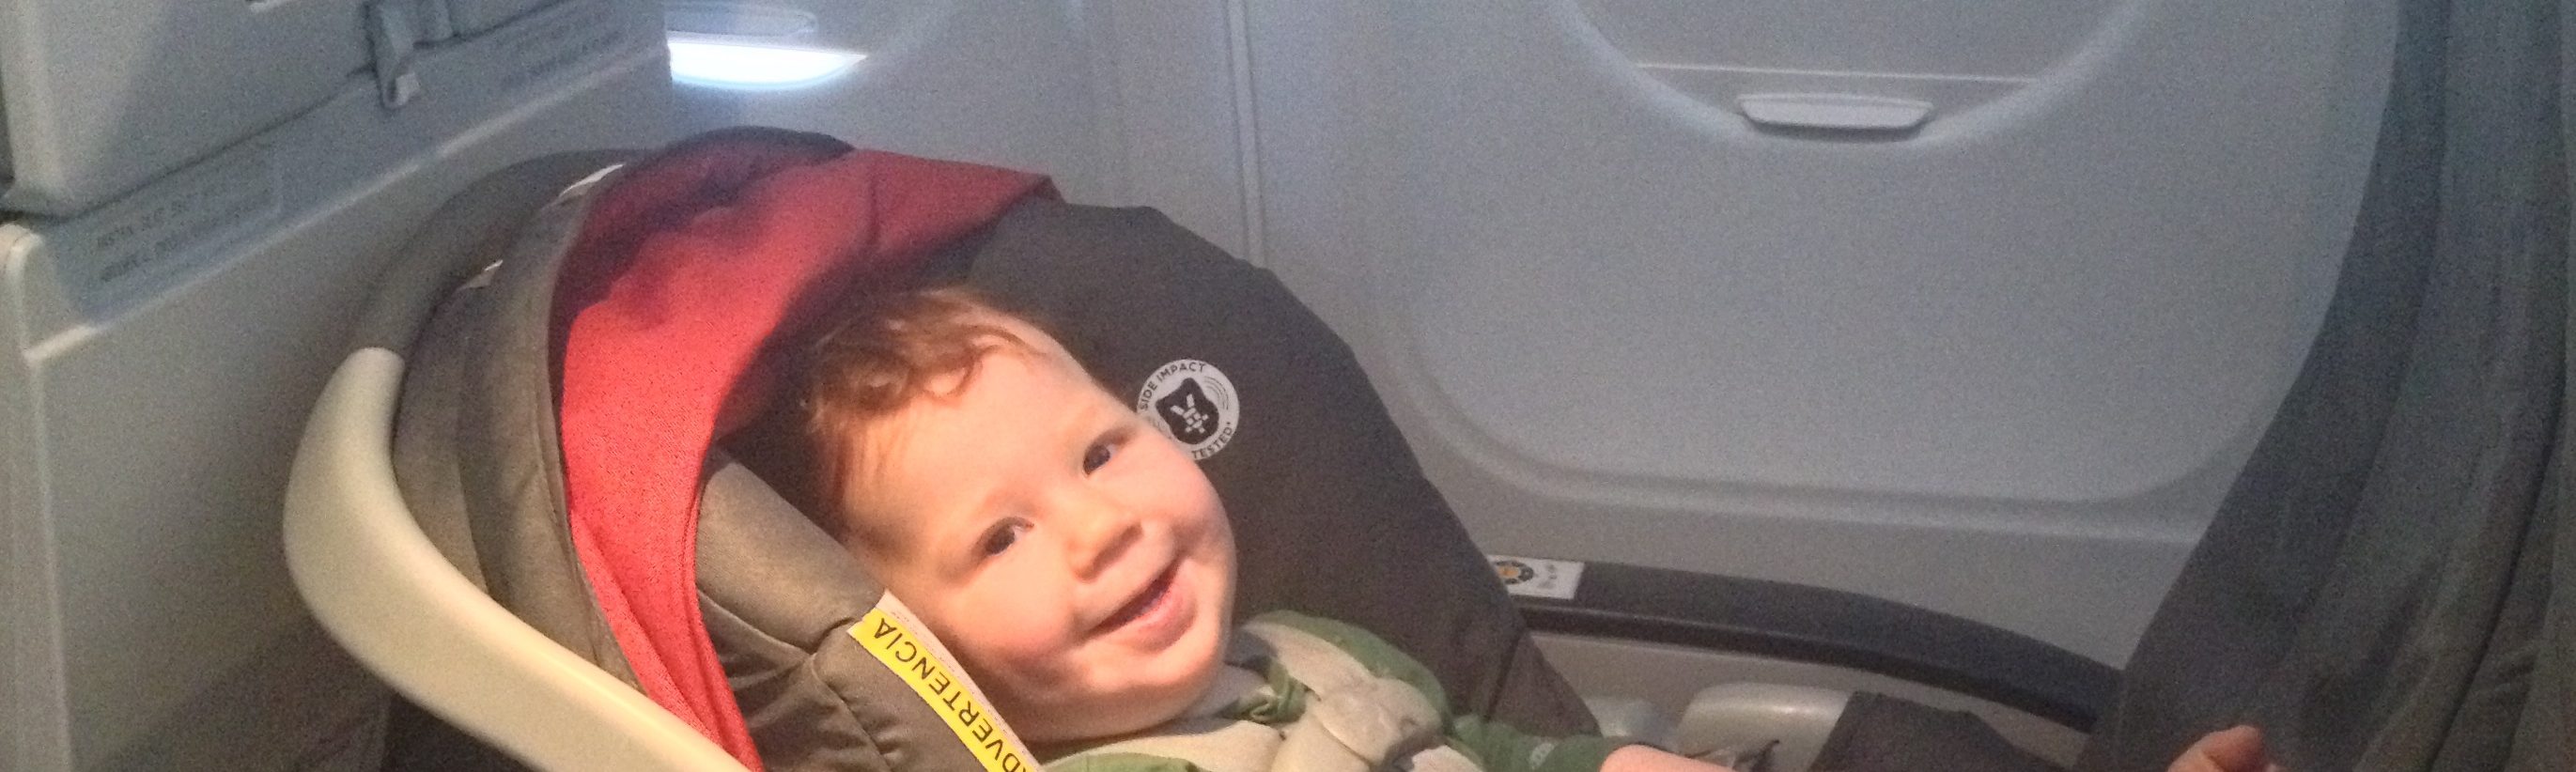
You’re flying somewhere with your kids. You’re already bringing a stroller, a portable crib, toys, a suitcase, a diaper bag, and one or more children. Many parents are overwhelmed by the sheer amount of stuff a child requires, and the first item to get left at home is….you guessed it, the car seat! This shouldn’t be the case! Kids are vastly better protected if they use a car seat on the plane.
But you could save a lot of money by having your child be a lap baby! Why should you bother bringing the car seat, especially if it’s not legally required?
During take off, landing, and turbulence, all bags and objects on the plane must be stowed, because anything unsecured is able to fly around if a problem were to occur during these parts of the flight. Children in a car seat are securely attached to the airplane seat — just like everybody and everything else in the aircraft cabin. Doesn’t your child deserve the same protection as your — or your suitcase?
Installation Video: Now that you’re convinced, here’s how to install a RFO on an airplane
Airline Push Back: If you’re getting push back from flight attendants or other airline personnel about using your car seat, please see our Passengers Bill of Rights, which contains proof that you are legally allowed to use your approved car seat on flights on a US based carrier and on flights on any carrier that both originate and end in the US. You can show this Bill of Rights and the accompanying documentation to the airline personnel to help in your argument for using your car seat on board the aircraft.
Raising or lowering the straps: As your child grows you’ll need to raise the straps–otherwise they’ll be too low. Before raising the straps, check to see if your child is still using an infant insert. The insert should be removed (in most cases–check your seat’s instruction manual) before raising the straps to the next level. Removing the infant insert will lower the baby’s position in the car seat and may delay the need to raise the straps for a few more months.
When it’s time to raise the straps: First, make sure it’s actually time. The shoulder straps must be emerging from the back of the seat at or just below your child’s shoulders, as seen in this photo.
If you can see the slot where the straps are emerging from the car seat shell, the straps are too high and should be lowered.
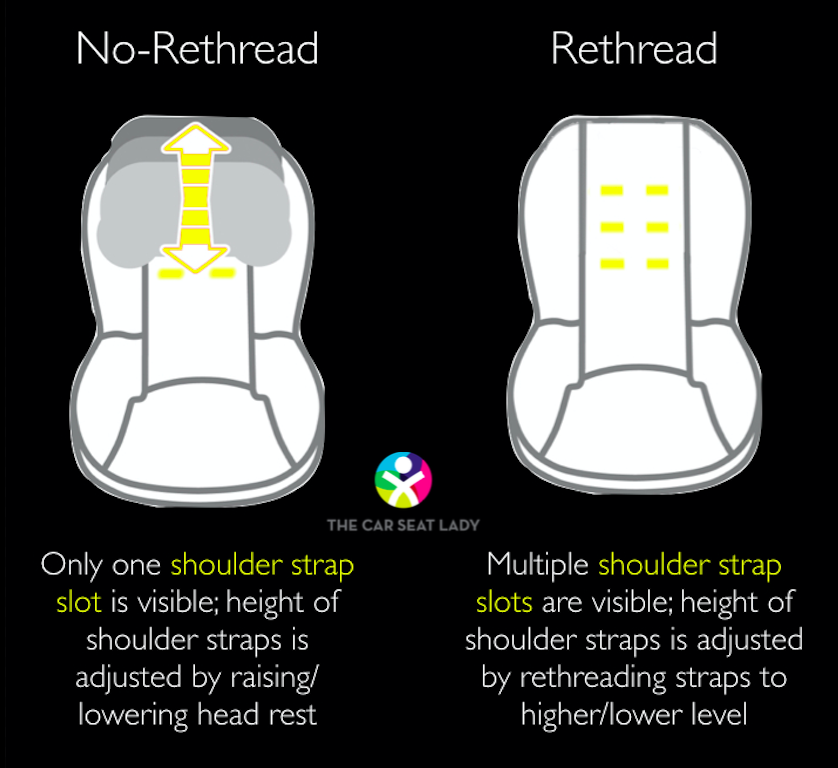
If it’s REALLY time for the straps to go up: Your RFO car seat allows for one of two methods of adjusting the car seat straps up or down, either the No-Rethread or the Rethread (Manual) system.
No-Rethread System: For these seats, the straps move up or down when you pull a tab or squeeze a lever on the top or back of the car seat. By pulling or squeezing the tab or lever, you can raise or lower the headrest, which also raises or lowers the straps.
Rethread, or Manually Adjusted System: The majority of RFO car seats feature this system, where you will need to unhook the straps from a metal plate on the back of the car seat carrier, route them out the front of the car seat (through the slots) and back through a higher or lower slot, and then reattach them to the metal plate once more.
Before starting this process it’s helpful to take a photo of both the front and the back of the car seat so you have a guide for how the straps should look when you are done.
Always check to make sure you haven’t twisted straps. Also make sure the straps are fully secured on the metal plate when you’re done.
ALWAYS check the instruction manual to make sure you’re routing the straps properly, as some must be routed under or over specific parts of the car seat or attached to the metal plate in a very specific manner. For example, we very often see incorrect strap placement on the Nuna Pipa as shown in the photo below:
Infant inserts: These are often required to make newborns and small infants tall enough to fit in the car seat properly. To safely use a rear-facing car seat, including a RFO, a child’s shoulders must come up at least to the lowest harness slot on the seat. (PHOTO). As most newborns are not tall enough to reach this slot, most RFO car seats come with a removable infant insert designed to rest under the baby’s bottom, making the baby sit higher in the seat.
When should you remove the infant insert?After a few weeks or months the baby will have grown and the insert becomes unnecessary. You may stop using the insert when your child’s shoulders are even with the lowest harness slot setting, or when your seat recommends discontinuing use of the insert.
Padded head inserts: Infant inserts that just go behind the baby’s head typically cause the head to fall into a potentially unsafe position. We recommend these inserts not be used unless specifically required by the manufacturer.
Note: It is NEVER okay to add another infant insert to the car seat. If it did not come with your car seat, do not use it!
Many RFO car seats have two positions for the crotch buckle. Read your car seat’s instruction manual to find out the proper crotch buckle position for your child.
These are often required to make newborns and small infants tall enough to fit in the car seat properly. To safely use a rear-facing car seat, including a RFO, a child’s shoulders must come up at least to the lowest harness slot on the seat. As most newborns are not tall enough to reach this slot, most RFO car seats come with a removable infant insert designed to rest under the baby’s bottom, making the baby sit higher in the seat.
When should you remove the infant insert?After a few weeks or months the baby will have grown and the insert becomes unnecessary. You may stop using the insert when your child’s shoulders are even with the lowest harness slot setting, or when your seat recommends discontinuing use of the insert.
Padded head inserts: Infant inserts that just go behind the baby’s head typically cause the head to fall into a potentially unsafe position. We recommend these inserts not be used unless specifically required by the manufacturer.
Note: It is NEVER okay to add another infant insert to the car seat. If it did not come with your car seat, do not use it!
We’re based in New York City where, regrettably, it’s fully legal to take a child in a taxi or uber without using a car seat. But just because something is legal doesn’t mean it’s safe. You wouldn’t ever take your baby in your own car without a car seat…..so why would you do it in a taxi or uber? The yellow paint or TLC license plate does not magically change the laws of physics!
An unrestrained baby will be at great risk of injury or death in a crash regardless of the type of vehicle they’re riding in. Taxis and ubers do get into crashes!
Nearly 10,000 infants a year in the US suffer a head injury when they fall from or in their car seat when its used out of the car. That’s about equal to the number of babies injured in car crashes!
Another study found that between 2004-2008, 31 babies died in their car seats due to asphyxiation (lack of oxygen) or strangulation. Most of these injuries occurred outside of the car and often to older babies–the median age was 9 months.
Jaxon 8/1/2014-10/8/2015
Jaxon’s mom Meredith wants you to know that Jaxon was a bubbly and precocious child, walking at 10 months and running just weeks after. On October 8th 2015, Jaxon ran some errands with his caregiver and fell asleep in his infant car seat. Not wanting to wake him, the caregiver brought him inside to a quiet room so he could finish his nap. The caregiver left the chest clip buckled, but unbuckled Jaxon’s crotch buckle – a mistake many adults make because they feel bad about leaving a baby buckled, especially while sleeping. Jaxon wiggled in his sleep and as he slipped down his throat got caught on the chest clip – and the more he wiggled, the worse it got. When the caregiver went to check on him, it was too late. He had strangled to death. Had the crotch buckle been buckled, he wouldn’t have been able to slouch down, which is what enabled him to strangle on the chest clip.
Shepard 1/14/2015-4/6/2015
Shepard was the healthy baby his mom Ali had longed for after 4 miscarriages. On April 6, 2015, Shepard was in the home of his licensed daycare provider. When it was time for his nap, Shepard was swaddled and placed in his car seat. The straps were left completely unbuckled, presumably because he was “just in the house.” While he was sleeping, Shepard wiggled and slouched and his head fell down into a chin-to-chest position. Because he was so young he couldn’t lift his head up to open up his airway. No one noticed in time, and he asphyxiated to death at just 11 weeks of age. Had he been buckled snug he wouldn’t have been able to slouch down, which is what caused his chin to fall to his chest.
Which kids are at risk?
Strangulation:
Any child of any age in a car seat where the straps are completely unbuckled (kids can get caught in the straps)
Any child of any age in a car seat where the chest clip is buckled but the crotch buckle is unbuckled
Asphyxiation:
Any child who is unable to sit upright unsupported – typically babies under 6 months of age
How to avoid this happening to your family
1. Use the car seat as a car seat. Car seats are NOT strollers, cribs, baby swings, a place to nap at daycare, etc. Use the car seat in the car, and remove the baby from the seat when you arrive. We know it’s a shame to wake a sleeping baby so if you aren’t going to wake your sleeping baby when you get home, make sure to follow the rules below to minimize risk.
2. Put the car seat in the car, on the stroller, or on the floor. Never put the car seat on a soft surface – like a bed, sofa, or even in the baby’s crib. Car seats can overturn when babies wiggle in them and babies have suffocated when their faces press into the soft surface.
Never put the car seat on a shopping cart, counter top, restaurant high chair, table, sofa, etc. Even though it might seem like a good idea in the moment, car seats get knocked off of these high surfaces all the time, leading to the nearly 10,000 head injuries in babies every year in the US.
3. ALWAYS keep the straps completely buckled AND snug. Do not loosen the straps…even if the baby is just finishing his nap on your living room floor, or you’re just in the stroller, or just anything. Snug straps help babies breathe better by preventing the baby from slumping over and by helping keep the head better positioned. Snug straps make it less likely for the baby’s head to fall into a chin-to-chest position. Loose or unbuckled straps are an asphyxiation risk because the baby’s head can fall into an unsafe position for breathing, as happened to Shepard. Loose or unbuckled straps are also a strangulation risk as the baby can roll over and get his neck caught in the straps.
Do not buckle just the chest clip – this is a significant risk for strangulation. The crotch buckle is there to prevent your child from slouching down in the seat. Without the crotch buckle, babies have strangled on the chest clip; babies like 9-month-old John Norris, 14-month-old Jaxon Lemerand, 17-month-old Major Maxie, and too many others.
Family members reached out to us after these close calls:
This 8-week-old’s mom said “I left him to make his bottle and came back to this!”
The mom of this 1 week old said “I *just* set her in the seat while I grabbed my toddler’s shoes from the other room. I was gone for less than a minute.”
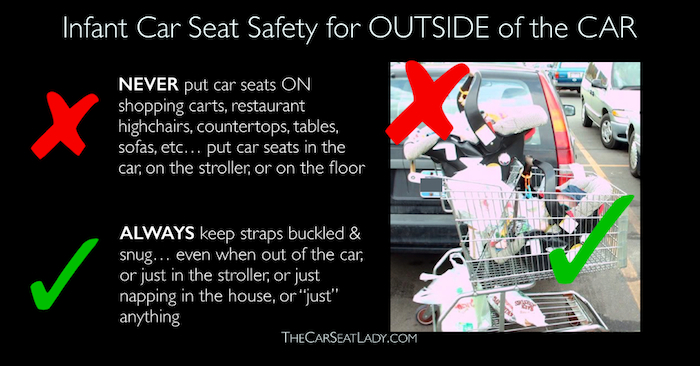
Parents use infant car seats as more than just car seats. Babies are often carried in these seats, ride in them on stroller frames, sit in them atop shopping carts, and nap in them while in the house and on the go.
But car seats were designed for vehicles, not for strollers, shopping carts, beds, cribs, etc., and when used outside the car unintended consequences can occur.
A 2010 study in the journal of the American Academy of Pediatrics found that nearly 10,000 babies in the US are injured each year in their infant car seats NOT in crashes, but rather while using the seats outside of the car. 1 in 10 of these babies were injured severely enough that they had to spend at least one night in the hospital! Of the injuries, 85% were related to falls – 65% of the infants fell out of the car seat and 15% fell from elevated surfaces, with shopping carts, tables, and counters being the most common surfaces.
Watch the video below showing a very very lucky baby. Most babies aren’t so lucky to have a store employee catch them as they fall out of the car seat from the top of the shopping cart. This baby’s family could’ve avoided this scare had the parent remembered two simple things:
Always buckle the child’s straps
Always put the car seat IN the shopping cart’s basket– not ON the shopping cart.
How to avoid these types of injuries:
1. Keep harness straps snugly buckled AT ALL TIMES. Anytime your baby is in the car seat — be it in the car, on the stroller, in your house — the harness straps must be BUCKLED and SNUG. When unbuckled, a baby can fall out of the seat, which is a frequent source of head injury. Besides falling out of the seat, there are other hazards to being loosely buckled or unbuckled:
the child can get their neck caught in the straps and strangle
the child’s head can fall into a position that is difficult for breathing and can stop breathing.
2. Put the car seat in the car, on the stroller or on the floor. Never put the car seat on a shopping cart, restaurant high chair, counter top, bed, crib, sofa, table, bench, etc. The car seat can fall from these raised surfaces.
What about the grocery store, Target, Walmart, etc? Specifically regarding shopping carts, if you bring the car seat into the store, put the car seat IN the basket of the shopping cart rather than on top of the shopping cart. Or put the car seat on your stroller and bring the stroller into the grocery store.
The importance of the recline angle: Newborns and young babies don’t have head control. If they’re placed in an upright position, they can’t keep their heads up and will move into a chin-to-chest position. This position is dangerous as it can make breathing difficult. Older children and adults can (and will) simply move their heads out of this harmful position, but newborns and young babies can’t make this correction. Therefore, we must position their car seats at such an angle that this chin-to-chest position is unlikely to occur.
Why can’t the baby just lie flat in the car? Wouldn’t that solve the problem? Laying down flat is better for babies compared to the car seat’s semi-upright position….but a car seat in this position may not perform well in a crash.
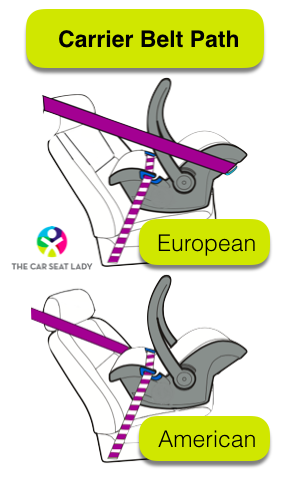
If you don’t know what the European Belt Path is, see here first.
In the USA and Canada:
The European belt path routes the shoulder part of the seat belt behind the back of the infant carrier, which allows a tighter and more secure installation. A tightly installed car seat will move less than a loosely installed seat. We’ve found that it is typically much harder to achieve a tight installation with the American belt path….which means the seat is much more likely to be loosely installed.
Why does it matter if the seat is installed tightly? It’s the same reason why you’d want your parachute harness to be strapped tightly to your body or your climbing harness tightly secured to you.
In addition to the general tight installation, the European belt path places the shoulder belt in a position where it can actually reduce the car seat’s rotation during a crash! Because the seat belt is tightly locked behind the back of the car seat, it prevents the car seat from rotating down towards the floor of the car. If you think to yourself “Hey, that sounds like what a load leg does!” you’d be correct–a European seat belt installation does the same thing in preventing downward rotation in a frontal crash. The car seat will not rotate as much, which means the baby won’t slide up in the seat as much. When a baby slides up the seat, forces are applied to the baby’s neck and shoulders. If the seat does not rotate downward, the baby doesn’t slide up as much, and we avoid those forces on the baby’s neck and shoulders. Instead the forces are absorbed by the back of the car seat and can be distributed across the baby’s back-a much stronger and less delicate body part compared to the neck and shoulders.
The European belt path also helps by reducing the seat’s rebound. If the baby slides up the seat less, there is likely to be less movement in the other direction–forward–which is a movement we definitely want to avoid with small babies.
To keep baby safe in the car in the event of a crash
To keep baby safe in the car seat, so that baby remains in the proper position and does not move into a position dangerous to breathing
First, tight straps help in a crash: The forces that your baby feels in a 30mph crash are akin to jumping out a 3rd story window and landing on the pavement. Jumping would be crazy, but if you had to do it, using a parachute would give you the slowest, gentlest stop.
In a crash, your child’s car seat performs just like that parachute. If your child’s straps are snug to their body AND the car seat is tightly installed in the vehicle, the car seat will act like a parachute, giving your child the slowest, gentlest stop in a crash. If the car seat straps are loose on your child’s body OR if the car seat is loosely installed in the vehicle, your child will come to a jolting, sudden stop, like if you were to jump out that 3rd story window and land on your feet.
This jolt is what causes injury. The jolt also allows the child to move farther forward within the vehicle, increasing the risk of the child hitting their head on a hard structure in the vehicle–like a door, window, or back of the front seat. Avoiding this jolt is key to avoiding injury.
When skydiving, people instinctively understand that their lives depend on their parachute harness. As such, they wear a thin jumpsuit under the harness, and not a puffy coat. People want the harness to be as tight as possible to their body. Do you think anyone ever says “Hey, my harness is too tight, let’s loosen it” before they jump out of a plane? Of course not! So too your child’s car seat is their harness that their life depends on. Make sure to make it very tight every time.
Second, straps help position baby: Snug straps help babies breathe better by preventing the baby from slumping over and by helping keep the head better positioned.
Do not buckle just the chest clip – this is a significant risk for strangulation. The crotch buckle is there to prevent your child from slouching down in the seat. Without the crotch buckle, babies have strangled on the chest clip; babies like 9-month-old John Norris, 14-month-old Jaxon Lemerand, 17-month-old Major Maxie, and too many others.
The short answer: No! These products are not tested with the car seat and therefore it is unknown how they may affect the car seat’s performance in a crash. Extra padding or materials in the car seat could:
Change the way the harness straps fit your child so that:
the straps are not on the proper part of your child’s body or
the straps are not as tight as is necessary.
Raise your child’s temperature to an unsafe level
Restrict your child’s movement, causing them discomfort.
We know extra padding can have these effects because during the car seat creation process, sometimes manufacturers have to redesign their own padding when said padding causes unintended negative performance in the many crash tests they perform before a seat comes to market. Sometimes the negative performance can be caused by something as small as where a stitching line is located!
What about the pads that came with the car seat? It IS safe to use products that came in the box with your car seat. Since all the infant positioners that come with the car seat have been extensively designed and redesigned based on their crash test performance in the manufacturer’s own tests, they are safe to use and often are required at some stage of the baby’s development. As always, check your car seats instruction manual to find out your seat’s requirements.
We’re big fans of babywearing and did it constantly with our own kids….but never in a taxi or uber (or any other car for that matter!) While your pediatrician, friend, or baby care instructor may have said it is okay, fabric carriers like the Baby Bjorn, Tula, Ergo, Lillebaby, Snugli, etc, will not protect a baby in a crash.
The Australian Transport Safety Bureau created a video of a crash test where an adult dummy wore an infant dummy in a BabyBjorn. As you can see in the video, the BabyBjorn fails to hold the infant and he goes flying into the front of the test platform. We created a short video including the crash test explaining what happens technically and why it happens.
In a similar study, researchers Kathleen Weber and John Melvin of the Highway Safety Research Institute at the University of Michigan Medical School tested this same scenario using a 30 mph, front, dynamic crash test of the type required by the current U.S. federal safety standard for child car seats. Unfortunately we have no video of this crash test. In the test, an adult wore the baby in a soft, cloth front carrier like the Baby Bjorn and used a lap/shoulder belt. The researchers found that this infant was at a very high risk. The tested carrier shredded completely, ejecting the infant dummy into the dashboard. If the carrier had not shredded, they found that the infant would likely still not have survived. As the adult’s head traveled forward in the whiplash motion, the adult’s chin would have slammed down into the infant’s head right where the soft spot is.
If you find yourself in a taxi with just your infant and a Baby Bjorn or other carrier (hopefully you never will), there is NO way to protect your baby! However, you can still protect yourself by wearing your seatbelt. Putting the seatbelt over you and the baby will only make matters worse. It will not help the baby and will endanger you in the process.